Monday, June 3, 2013

The Garden is Growing - 2013 Style

This post brought to you by Miracle-Gro. All opinions are 100% mine.
Last year I spoke about some yard and garden work that we were busy with. We had had some trees taken down and grass planted in their places and for the first time, the kids and I planted a garden. The grass grew in nicely in most of the yard,
but there's still a patch that we will need to reseed in the fall.
The garden also did quite well so the kids and I decided to plant another one this year. Unfortunately, the garden started out looking like this:
My husband was kind enough to rip out all the weeds so we could start from scratch. The other area that I wanted to work on was right around this light pole in the front of our house:
Before I planted anything, my go to soil is always Miracle-Gro. It has never let me down and nourishes the plants for months at a time. They've got so many other great products besides soil, not to mention their plant food. You can even follow their fun garden projects on their Pinterest page where gardeners can swap ideas and projects and be sure to like The Gro Project on their Facebook page. They have so many great DIY projects that are simple to create.
Here's what the light pole is looking like today:
I just planted them and already they are blooming like crazy! (Disregard the over-grown grass, we are having some issues with our lawn mowing company...) Petunias do great in full sun and spread out nicely so I'm hoping that it'll soon wrap around the area more. I also planted some bulbs that I got from a fundraiser at my daughter's school, but I'm not sure if we'll have to wait until next spring for them to bloom.
The garden is also doing amazingly well! We've got cucumbers:
Snap peas:
And green peppers:
Too bad the MiracleGro also helps the weeds grow super strong! I need to get another bag of mulch to put around the plants to keep the weeds at bay. As you can see, it's a no brainer to use MiracleGro products because it works so well to nourish the plants and help them flourish.
Be sure to check out this video about MiraclGro's new Gro Project and join the millions of green thumbers!


Visit Sponsor's Site

Wednesday, May 8, 2013

Math Lover's Clock

It took Sherry and Katie's Pinterest challenge to get me off my rear and finally post a new project! A friend of mine who is a math teacher showed me this adorable clock she got for her classroom. As soon as I saw it, I knew it was a great DIY project and pinned an image I found online. This project is actually very timely for this time of year - great for teacher gifts, graduation or simply any math lover that you know. I actually plan to give this to my dad for father's day so Dad, if you're reading this, now would be a good time to stop!


These are the supplies I bought for the project - 10" wooden circle, clock mechanism, black craft paint and a white paint marker. (FYI, the wooden circle is sold right below the clock mechanism in Michael's and it's perfect because there's already a circle drilled through the center.)


First thing is to paint the wooden circle. I used a 1" foam craft brush and did two coats.


While I painted the back and the edges, I stuck a pencil through the center hole to hold it up. You need to paint the back because the clock mechanism (where the battery goes) sticks out a little which prevents the clock from sitting flush against the wall.


The next step was the most time consuming and that was recreating the math problems in Illustrator. If anyone is interested in a pdf of the file, please feel free to drop me an email. I printed it out exactly to size and then then taped the papers together.


Before I taped it to the clock, I shaded the back of it over the areas I would want to transfer - think old school transfer paper!


Then I just traced over each number and it appeared lightly on the clock face.


I used the white paint marker to pretty much color in the lines and then followed the directions on the clock mechanism to put it all together.


I love that it has a chalkboard feel to it! This is also perfect for a home-school classroom.


Are there any math lovers in your life?


Pin It

Linking up:
Young House Love | Bower PowerRed Bird BlueSparkle Meets Pop | Craftionary | DIY Showoff | Serenity Now | House on the Way | Twelve O Eight | Home Stories A to Z | Today's Creative Blog |

Monday, March 18, 2013

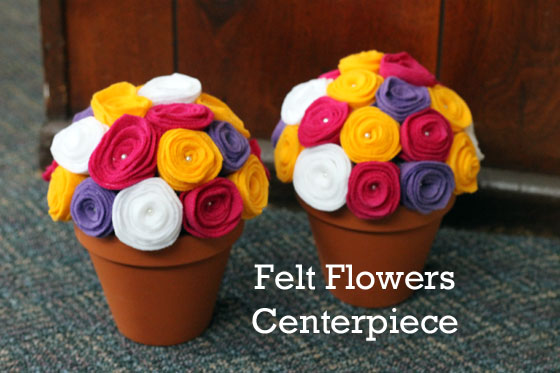
Felt Flower Centerpiece

Although it's hard to feel it with temperatures still in the 30s some days, Spring is right around the corner. And with that comes the holiday of Passover (and Easter) - time to gather with family and celebrate. We are once again hosting a nice size crowd for the seder and I wanted to do something different from last year's centerpieces. I saw some tutorials of how to make a felt flower centerpiece (here and here) and decided to give them my own little spin.


Here's what you'll need (the sizes and amount will depend on how big and how many you want to make, I listed what I used): 2 4" clay flower pots, 2 4" foam balls, 12 pieces of 9x12" felt (6 per flower pot), pearl-head pins, and tacky glue (you could also use hot glue)


Start by tracing circles onto your felt (I got four circles per sheet). You can use the flower pot or any other small bowl or plate. After you cut them out, cut the circles into a sprial shape. They don't have to be perfect (as you can see), and in fact, the irregularities are what make each flower a little different so I didn't even try for perfection.


Starting from the inside of the spiral, twirl the felt around the center until you get to the end, keeping the flower fairly flat on the bottom. This is what it should look like:


Use just a small line of glue to seal it closed.


Make sure you're watching something good on TV while you're doing this, because it might get a little tedious after the first two 10. Repeat and repeat until you've created flowers out of all of your felt circles.


Next, take your pearl-head pins and push them through the center of each flower.


Place your foam ball in the flower pot and you can now start pinning the flowers right into it. No need for glue since the pins are long enough to keep the flowers in place.


Just put them in any random order. I tried to make sure no two of the same color were touching, but the truth is that it doesn't really matter if they are.


And now you've got two beautiful spring centerpieces. The great thing is that since you didn't glue anything together (besides the flowers), you can reuse the flower pots and foam balls for another project in the future!

Happy Passover or Happy Easter to you and yours. See you after spring break is over!


Pin It

Linking up:
Home Stories A to ZToday's Creative Blog twelveOeight | Not Just a Housewife | House on the Way | House of Hepworths | Serenity Now |

Monday, March 11, 2013

Upholstered Bench

Hey all! I know I've sort of fell of the face of the blogosphere for a while, but that doesn't mean I've stopped DIYing. I have a bunch of projects to share with you, it's just taken me a while to get my act together. Here's one of the projects I recently completed for my sister.


My brother's next-door neighbor was giving away this bench from her grandmother for free and my sister quickly snatched it up. She wanted something to put at the foot of her bed in her new house and this was perfect because she knew she had someone me to fix it up.


As you can tell, it had definitely seen better days, but it has great lines and I love the little key hole detail. 


I did a little research when I saw the manufacturer's label on the inside of the lid. It turns out that the company was started in 1907 and was the first company in the US to manufacture cedar chests. How cool!


My sister and I went to JoAnn and picked out this gorgeous fabric. (Unfortunately, I gave her the rest of what I didn't use so I don't know the name offhand.)


I took the lid off the chest and with some 2" foam and batting, I turned it into a comfortable spot to sit down and put your shoes on every morning.


There are a bazillion upholstery tutorials around so here's just a quick rundown: Lay the fabric upside down, then batting, then foam, then bench seat upside down. First staple the batting, pulling tight and then staple the fabric, making sure there are no wrinkles or too-tight areas.


Also, make sure to cut around where you need to screw the bench seat back into the base.


This is what it should look like when you're finished:


And flipped over:


The next step was to work on the base. I used my new orbital sander (thanks Dad!) and it was ah-ma-zing. Never will I go back to sanding by hand!


Then I used some tinted primer (left over from this project) and gave it two thin coats. I didn't want any of the wood to bleed through.


I brought the fabric to Home Depot and had them color match the gray in the fabric and they really did an amazing job. Two coats of paint later and it was done!


My sister really wanted their family initial on the front so I asked a friend of mine who does vinyl decals to whip something up for her. I measured the center of the bench and marked it off with Frog tape to make sure that I knew exactly where to place the letter.


It took a couple minutes for me to figure out the best way to apply it since I had never worked with vinyl before, but once I figured it out it went on very easily. (Hint: do not remove the entire thing from the backing at once - do it in sections!)


Here it is all finished:


I think it's a tie of who loves it more - I or my sister :-)


Tell me what you think! Have you ever had paint color matched to fabric before? This was my first time and I'm definitely going to do it again.


Pin It

Linking up: 
twelveOeight | Home Stories A to Z | House on the Way | House of Hepworths | The 36th Avenue | Craftionary | Serenity Now | DIY Showoff | Miss Mustard Seed |