Showing posts with label Quick and Easy. Show all posts

Wednesday, May 8, 2013

Math Lover's Clock

It took Sherry and Katie's Pinterest challenge to get me off my rear and finally post a new project! A friend of mine who is a math teacher showed me this adorable clock she got for her classroom. As soon as I saw it, I knew it was a great DIY project and pinned an image I found online. This project is actually very timely for this time of year - great for teacher gifts, graduation or simply any math lover that you know. I actually plan to give this to my dad for father's day so Dad, if you're reading this, now would be a good time to stop!


These are the supplies I bought for the project - 10" wooden circle, clock mechanism, black craft paint and a white paint marker. (FYI, the wooden circle is sold right below the clock mechanism in Michael's and it's perfect because there's already a circle drilled through the center.)


First thing is to paint the wooden circle. I used a 1" foam craft brush and did two coats.


While I painted the back and the edges, I stuck a pencil through the center hole to hold it up. You need to paint the back because the clock mechanism (where the battery goes) sticks out a little which prevents the clock from sitting flush against the wall.


The next step was the most time consuming and that was recreating the math problems in Illustrator. If anyone is interested in a pdf of the file, please feel free to drop me an email. I printed it out exactly to size and then then taped the papers together.


Before I taped it to the clock, I shaded the back of it over the areas I would want to transfer - think old school transfer paper!


Then I just traced over each number and it appeared lightly on the clock face.


I used the white paint marker to pretty much color in the lines and then followed the directions on the clock mechanism to put it all together.


I love that it has a chalkboard feel to it! This is also perfect for a home-school classroom.


Are there any math lovers in your life?


Pin It

Linking up:
Young House Love | Bower PowerRed Bird BlueSparkle Meets Pop | Craftionary | DIY Showoff | Serenity Now | House on the Way | Twelve O Eight | Home Stories A to Z | Today's Creative Blog |

Monday, March 18, 2013

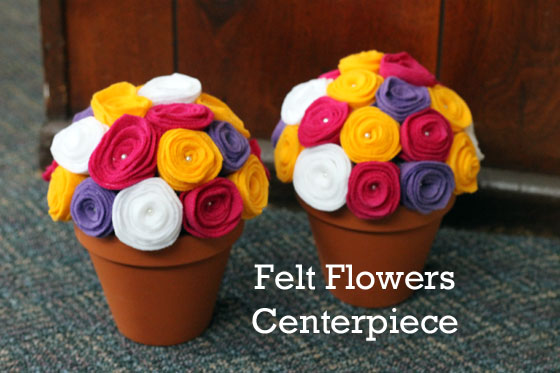
Felt Flower Centerpiece

Although it's hard to feel it with temperatures still in the 30s some days, Spring is right around the corner. And with that comes the holiday of Passover (and Easter) - time to gather with family and celebrate. We are once again hosting a nice size crowd for the seder and I wanted to do something different from last year's centerpieces. I saw some tutorials of how to make a felt flower centerpiece (here and here) and decided to give them my own little spin.


Here's what you'll need (the sizes and amount will depend on how big and how many you want to make, I listed what I used): 2 4" clay flower pots, 2 4" foam balls, 12 pieces of 9x12" felt (6 per flower pot), pearl-head pins, and tacky glue (you could also use hot glue)


Start by tracing circles onto your felt (I got four circles per sheet). You can use the flower pot or any other small bowl or plate. After you cut them out, cut the circles into a sprial shape. They don't have to be perfect (as you can see), and in fact, the irregularities are what make each flower a little different so I didn't even try for perfection.


Starting from the inside of the spiral, twirl the felt around the center until you get to the end, keeping the flower fairly flat on the bottom. This is what it should look like:


Use just a small line of glue to seal it closed.


Make sure you're watching something good on TV while you're doing this, because it might get a little tedious after the first two 10. Repeat and repeat until you've created flowers out of all of your felt circles.


Next, take your pearl-head pins and push them through the center of each flower.


Place your foam ball in the flower pot and you can now start pinning the flowers right into it. No need for glue since the pins are long enough to keep the flowers in place.


Just put them in any random order. I tried to make sure no two of the same color were touching, but the truth is that it doesn't really matter if they are.


And now you've got two beautiful spring centerpieces. The great thing is that since you didn't glue anything together (besides the flowers), you can reuse the flower pots and foam balls for another project in the future!

Happy Passover or Happy Easter to you and yours. See you after spring break is over!


Pin It

Linking up:
Home Stories A to ZToday's Creative Blog twelveOeight | Not Just a Housewife | House on the Way | House of Hepworths | Serenity Now |

Monday, January 21, 2013

Organized Cabinet

So you know how the old saying goes, "be careful what you wish for because you just might get it"? Yeah, that happened to me. Back in October (can't believe it was that long ago!) I posted about my wish for open shelving in my dream kitchen as part of the "50 Simple Things to Update Your Home" series. Not too long after that, a hinge broke on a cabinet door and it was just hanging by one. The local hardware stores didn't have a perfect fit, and as you can see, these cabinets use fancy European hinges and have a circle drilled into the interior of the cabinet.


I found a website that could potentially have had the proper hinge, but they required so many measurements that it was getting too complicated. The hubby and I decided we'd make the best of it and decided to keep the cabinet open.


The good part was that it was an end cabinet and so it doesn't look so random. The bad part was that it doesn't exactly have the most beautiful things to look at. I used this as a perfect opportunity to organize (i.e. purge) and change things up a bit.

The first step to organizing any space is to empty it completely and then scrub it down.


Step two is to sort everything into categories to keep, relocate or trash.


I got rid of all the expired vitamins, medicines and sunscreen, as well as things we no longer use or need. I decided to relocate the everyday paper goods - paper plates, plastic cups, etc. to our pantry since that just makes more sense. I moved the cookbooks here so they are easy to get to and decided that we could do without one of the shelves.


I picked up a few containers from the dollar store to organize the medicines and vitamins into two sections - one for stuff used daily, and the other only for when someone is sick. I put the other random, seldomly-used plastic ware on the top shelf. But it just wasn't doing it for me so I decided to splurge at Target and get some nice looking containers. After all, I'd be looking at them every day and I knew the dollar store containers could easily be repurposed elsewhere.


Lucky for me Target was having a storage sale and I got these white containers there. The basket on top is from the Nate Berkus line and I love how it adds a natural element to the space. So much better!

And no post would be complete without a good side by side before and after!


So much better looking, don't you think? Have you ever had a kitchen cabinet door fall off?


Pin It

Linking up here:
Home Stories A to Z Today's Creative BlogtwelveOeight | House on the Way | Craftionary |

Thursday, January 3, 2013

Updated Bathroom Light Fixture

Hey guys! Thanks so much for being patient with me for these past couple months while I've taken a little break. It's been so relaxing spending time with my family over the holidays and focusing my time on them instead of blogging. But just the same, it feels great to be back and having the chance to re-connect with all of my readers. My stats have surprisingly been pretty steady thanks to pinterest and other bloggers referring readers here so thank you so much - I've missed you all!

Here's a super easy project that I completed back in November. This was the light fixture in the hall bathroom that came with our house (minus one light bulb). Silly me thought those big globes were the light bulb coverings and that there was an actual bulb inside. Fast forward five years and one of them burnt out, only for us to discover the reality! Not your standard size to say the least... I didn't cry too hard about it and was happy to have an excuse to replace the fixture.


I picked out this fixture from Lowe's and my dad helped me installed it. It was definitely an upgrade but the brassy trim along the medicine cabinet mirrors was not working for me. I know there's all the talk now of mixed metals, but the proximity of the two made them clash.


Remember when I used this amazing little crafting invention back when I painted the front door? This time I got it in a silver leaf and rubbed and buffed away!


Here's an in-progress shot so you can see the difference:


And here's the finished mirror!


So much better! And for my favorite - a before and after picture:


The rub and buff part took about 10 minutes and it makes such a difference. What projects have you used rub and buff with?


Pin It

Linking up: 
Serenity Now | Today's Creative Blog | twelveOeight | Home Stories A to Z | Not Just a Housewife |

Monday, October 29, 2012

Privacy Window Film Tutorial

My sister recently bought a new house (full tour to come soon) and they are slowly working on making it "theirs." The other day I drove up for a visit and noticed that you could see all the clothes hanging in her laundry room from outside the house. Uh, not what she wants the whole neighborhood to see! I told her that they make privacy window film that would still let light come in, but prevent her neighbors from seeing their laundry. She didn't hesitate to have me to work on this project for her.

She had already taken down her laundry before I took this shot, but you can get a little peek inside the arched window. (Sorry for all the phone pics, I forgot to bring my good camera.)


This is the view from inside the laundry room.


I pretty much followed Young House Love's directions from when they used a similar product on their first house's basement windows and door. My brother-in-law picked up a plain frosted film and a textured film. We decided to use the plain one on the window and we'll use the textured one on the sidelights of the front door at a later time.


First thing to do is trace around the window and cut out a piece of the film, about an inch or two wider all around.

Next, spray the window with a solution of water and a little dishwashing detergent. I had a GILA Window Film Kit from when I had done this to a window in my own home so that is what I used. Spray liberally!


I couldn't get a picture of the next step, but you just peel back the paper from the film and place it over the window. Because you cut it bigger, it doesn't need to be lined up perfectly, because you will trim the excess anyway. Just do your best to center it and you should be fine.

Use the "squeegie" from the kit or any old credit card will do, and starting from the center, smooth it across to the outer edges to get out all the air bubbles. Don't worry if the edges aren't completely flat yet.


After the film is smooth, use a razor blade (your own or from the kit), and get in real close to the window frame. Get in to the space right where the glass meets the frame and carefully slide your razor blade and slice off the excess.


After: privacy + light!


It's not totally opaque so you can see shadows when something is directly in front of the window, but all least her neighbors won't get a free show anymore!

And since we all love a good before and after:


Another quick and easy project with lots of impact!


p.s. I'll be linking up with Sherry, Katie, Sarah and Carmel as part of the Fall Pinterest Party.

Pin It

Linking up:
Home Stories A to Z | House on the Way | House of Hepworths | At the Picket Fence |