Monday, October 1, 2012

Autumn Garland

Here's another great DIY project for fall that can really be adapted to any season or decor. I actually got the idea for this from my daughter's Highlights magazine. Go figure!


I adapted it somewhat and this is what I and my daughter created. Start out with these supplies that you probably have already.


Supplies: one piece of craft foam in color of your choice • tissue paper in a variety of colors • yarn, sisal, jute or any type of string of your choice (not shown) • craft glue (not shown)

Start by tracing circles across the entire piece of foam and cutting them out. I used (the inner circle) a roll of masking tape for mine.


Then cut your tissue paper into 1 inch squares.


Crinkle up the tissue paper as small as you can.


And glue them on to your circles in any shape you want. Since we were planning on hanging this in honor of Sukkot, we made fruits and vegetables on each circle.


You can use any other type of embellishments to enhance each circle.


We used pipe cleaners for the stems on many of ours.


After you've created the designs on each of the circles, use a hole-puncher to make a hole at the top of each one. Then string the sisal (or whatever you chose) and tie a knot after each circle so they stay in place.


Then hang it up wherever you'd like! Here it is hanging over our mantel-less fireplace.


And outside in our sukkah:


All in all, a great, easy project that even a seven-year-old can do did it!


Happy Fall!

p.s. See you after Sukkot!

Pin It

Linking up:
A Bowl Full of Lemons | House on the Way | DIY Showoff | House of Hepworths |

Wednesday, September 26, 2012

Flower Ball Tutorial

I don't really do all that much seasonal decorating in the house and since we don't have a real mantel, there's not a whole lot to decorate around. However, the Jewish holiday of Sukkot is coming up next week and it is a tradition to decorate the sukkah with produce, flowers and all things from nature. This is a great and easy autumn or Thanksgiving craft for anyone and it can modified to any season or color scheme.


This is all you need:


Supplies: foam ball (I used 6") • assortment of faux flowers, leaves, fruit, etc. in coordinating colors • 1 yard of ribbon (optional) •  hot glue

(I don't normally decorate with faux flowers, but since this is going to end up outside, real flowers were not an option since it has to be able to hold up against the elements.)

This first thing to do is wrap the ribbon around the ball and use your hot glue gun to glue it to the bottom and sides of the ball. If you will not be hanging it, you can skip this step.


Then use a wire cutter to cut all the flowers off their stems, leaving about an inch remaining.


You can get rid of the stems and you'll be left with a bunch of flowers like so:


Then comes the fun part! Just stick all the flowers in the ball with any random pattern that you choose. Try to space out the flowers and colors so you don't have a big spot of flowers that are the same type or color. Keep sticking them in until you can't see any of the white ball through.


You only need to use the glue for the leaves, fruit or anything else that doesn't have a real stem.


Here it is from another angle:


This is another one that I made last year.


And here it is hanging in our sukkah last year.


This is a pretty inexpensive project to replicate because you can get the flowers and foam from almost any dollar store. This can also become a beautiful Thanksgiving centerpiece. You can make a large one for the center of the table, or a few smaller ones to line up down the middle of the table. Just place the ball in a candlestick holder or rest it on a small clear plate.

Happy Fall!


Pin It

Linking up:
DIY Showoff | House of Hepworths | Thrifty Decor Chick | At the Picket Fence | Craftionary | Serenity Now | Creative Jewish Mom | It's Overflowing | DIY Showoff | The Chicken Chick | 320 Sycamore

Monday, September 24, 2012

Chalk Bin Solution

Ever since putting up this removable chalkboard, it has been covered with all sorts of drawings, doodles and messages.


The whole family enjoys writing notes and drawing pictures for each other. There was only one problem: no place to put the chalk and eraser. The kids could never find the chalk and I ended up just using a napkin to erase what was there. It was a pain and not a good solution. I started searching for a small, light container that I could use, but was coming up empty handed.

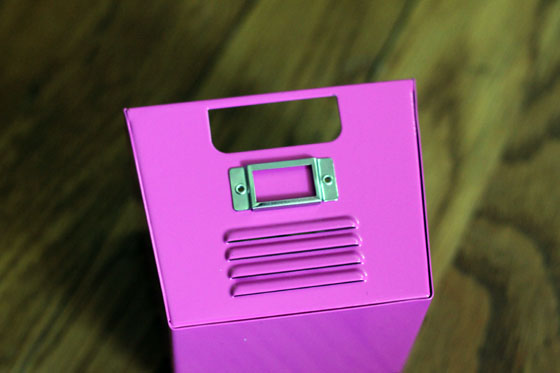
Finally on Friday I found the perfect solution. I was at Office Depot looking for something else, and I saw the school supplies was on clearance. Enter this little beauty for $1!


I know it's bright pink, but I did what any other self-respecting blogger would do and pulled out the good old spray paint.


A few hours later it was good to go! I used some command strips to hang it on the wall.


It's the perfect size for the eraser and chalk and now everyone can find what they want easily.


Here's a zoomed-out view. It sits in this little nook right when you enter the kitchen so I don't have to worry about anyone bumping into it. Now to swap out the light switches and plate for some white ones...


p.s. Besides Office Depot, Target was also having 70% off school supplies, so now's a great time to stock up on essentials for next year.


Pin It

Linking up:
Hi Surgarplum |

Thursday, September 20, 2012

Simple Ways to Update any Room (Part 5)

We are back to part five of the the "Simple Ways to Update any Room" series, inspired by House Beautiful. If you've missed any of the previous posts, check them out (Part 1, Part 2, Part 3, Part 4).

  
Just a reminder again to please pin from the original source.

  •  Paint the inside of your kitchen cabinets a color that sets off your dishes and glasses. Everything will look cleaner and more finished. 
I love the look of a few glass-fronted cabinets with a contrasting color paint inside. It really sets off whatever is displayed inside and is a great way to add color to a wall of monochromatic cabinets. Using chalkboard paint is a brilliant addition.
Source
Source
  • Take your jewelry out of the box. Put all your bracelets together in a big bowl and drape all your necklaces together over a bust. 
Are you like so many of us where out of sight means out of mind for our jewelry? What's the point of having all that gorgeous stuff if we don't wear it? Instead of keeping it all closed up in a box, it's so much more practical (and pretty) to display it out in the open! And don't worry if you don't have a pretty bowl to display your bling in, you can DIY one like the blogger below or search through pinterest for so many other great ways to display your jewelry.
Source

Source

Source
  • Change your house numbers.
This one is so easy and pretty cheap. You can get some off the shelf at a big box store, DIY it, or order a custom set from etsy. It can totally change your curb appeal (for the better!) with minimal effort and there are so many creative ways to do this. So do it! :-)
Source

Source

Source

  • Invest in a set of matched wooden hangers for your closet. You will feel like the most organized person in the world.
This has got to be the number one way to make any closet look more organized and put-together. The initial investment can get a little high, depending on how much clothing you own, but it's money well spent. Take a look at these super-organized closets and you'll see how the matching hangers makes a huge statement.
Source

Source
  • Tack nailheads on a plain, inexpensive ottoman.
Nailhead trim is big right now, and for good reason - it's gorgeous! There are so many ways to do it: headboards, chairs, ottomans, furniture, backsplashes, even a ceiling. I can't wait to incorporate something with nailhead trim into my home, and I'll definitely be sharing it with you when I do!
Source

Source

Source

So what do you think of this edition of "Simple Ways to Update any Room"? What room are you planning to update with any of these simple ideas?


Pin It

Linking up:
At the Picket Fence | Serenity Now | It's Overflowing | DIY Showoff | Not Just a Housewife | A Bowl Full of Lemons | The 36th Avenue |