Pages

Wednesday, September 26, 2012

Flower Ball Tutorial

I don't really do all that much seasonal decorating in the house and since we don't have a real mantel, there's not a whole lot to decorate around. However, the Jewish holiday of Sukkot is coming up next week and it is a tradition to decorate the sukkah with produce, flowers and all things from nature. This is a great and easy autumn or Thanksgiving craft for anyone and it can modified to any season or color scheme.


This is all you need:


Supplies: foam ball (I used 6") • assortment of faux flowers, leaves, fruit, etc. in coordinating colors • 1 yard of ribbon (optional) •  hot glue

(I don't normally decorate with faux flowers, but since this is going to end up outside, real flowers were not an option since it has to be able to hold up against the elements.)

This first thing to do is wrap the ribbon around the ball and use your hot glue gun to glue it to the bottom and sides of the ball. If you will not be hanging it, you can skip this step.


Then use a wire cutter to cut all the flowers off their stems, leaving about an inch remaining.


You can get rid of the stems and you'll be left with a bunch of flowers like so:


Then comes the fun part! Just stick all the flowers in the ball with any random pattern that you choose. Try to space out the flowers and colors so you don't have a big spot of flowers that are the same type or color. Keep sticking them in until you can't see any of the white ball through.


You only need to use the glue for the leaves, fruit or anything else that doesn't have a real stem.


Here it is from another angle:


This is another one that I made last year.


And here it is hanging in our sukkah last year.


This is a pretty inexpensive project to replicate because you can get the flowers and foam from almost any dollar store. This can also become a beautiful Thanksgiving centerpiece. You can make a large one for the center of the table, or a few smaller ones to line up down the middle of the table. Just place the ball in a candlestick holder or rest it on a small clear plate.

Happy Fall!


Pin It

Linking up:
DIY Showoff | House of Hepworths | Thrifty Decor Chick | At the Picket Fence | Craftionary | Serenity Now | Creative Jewish Mom | It's Overflowing | DIY Showoff | The Chicken Chick | 320 Sycamore

Monday, September 24, 2012

Chalk Bin Solution

Ever since putting up this removable chalkboard, it has been covered with all sorts of drawings, doodles and messages.


The whole family enjoys writing notes and drawing pictures for each other. There was only one problem: no place to put the chalk and eraser. The kids could never find the chalk and I ended up just using a napkin to erase what was there. It was a pain and not a good solution. I started searching for a small, light container that I could use, but was coming up empty handed.

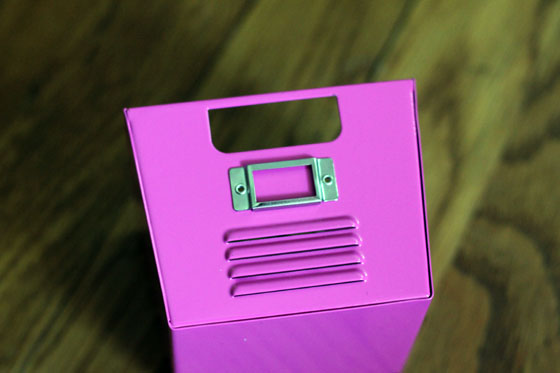
Finally on Friday I found the perfect solution. I was at Office Depot looking for something else, and I saw the school supplies was on clearance. Enter this little beauty for $1!


I know it's bright pink, but I did what any other self-respecting blogger would do and pulled out the good old spray paint.


A few hours later it was good to go! I used some command strips to hang it on the wall.


It's the perfect size for the eraser and chalk and now everyone can find what they want easily.


Here's a zoomed-out view. It sits in this little nook right when you enter the kitchen so I don't have to worry about anyone bumping into it. Now to swap out the light switches and plate for some white ones...


p.s. Besides Office Depot, Target was also having 70% off school supplies, so now's a great time to stock up on essentials for next year.


Pin It

Linking up:
Hi Surgarplum |

Thursday, September 20, 2012

Simple Ways to Update any Room (Part 5)

We are back to part five of the the "Simple Ways to Update any Room" series, inspired by House Beautiful. If you've missed any of the previous posts, check them out (Part 1, Part 2, Part 3, Part 4).

  
Just a reminder again to please pin from the original source.

  •  Paint the inside of your kitchen cabinets a color that sets off your dishes and glasses. Everything will look cleaner and more finished. 
I love the look of a few glass-fronted cabinets with a contrasting color paint inside. It really sets off whatever is displayed inside and is a great way to add color to a wall of monochromatic cabinets. Using chalkboard paint is a brilliant addition.
Source
Source
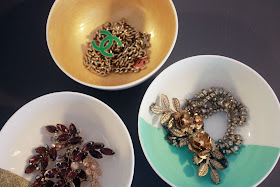
  • Take your jewelry out of the box. Put all your bracelets together in a big bowl and drape all your necklaces together over a bust. 
Are you like so many of us where out of sight means out of mind for our jewelry? What's the point of having all that gorgeous stuff if we don't wear it? Instead of keeping it all closed up in a box, it's so much more practical (and pretty) to display it out in the open! And don't worry if you don't have a pretty bowl to display your bling in, you can DIY one like the blogger below or search through pinterest for so many other great ways to display your jewelry.
Source

Source

Source
  • Change your house numbers.
This one is so easy and pretty cheap. You can get some off the shelf at a big box store, DIY it, or order a custom set from etsy. It can totally change your curb appeal (for the better!) with minimal effort and there are so many creative ways to do this. So do it! :-)
Source

Source

Source

  • Invest in a set of matched wooden hangers for your closet. You will feel like the most organized person in the world.
This has got to be the number one way to make any closet look more organized and put-together. The initial investment can get a little high, depending on how much clothing you own, but it's money well spent. Take a look at these super-organized closets and you'll see how the matching hangers makes a huge statement.
Source

Source
  • Tack nailheads on a plain, inexpensive ottoman.
Nailhead trim is big right now, and for good reason - it's gorgeous! There are so many ways to do it: headboards, chairs, ottomans, furniture, backsplashes, even a ceiling. I can't wait to incorporate something with nailhead trim into my home, and I'll definitely be sharing it with you when I do!
Source

Source

Source

So what do you think of this edition of "Simple Ways to Update any Room"? What room are you planning to update with any of these simple ideas?


Pin It

Linking up:
At the Picket Fence | Serenity Now | It's Overflowing | DIY Showoff | Not Just a Housewife | A Bowl Full of Lemons | The 36th Avenue |

Sunday, September 16, 2012

Sprucing Up Your Curb Appeal

This is a Sponsored post written by me on behalf of Scotts Miracle-Gro. All opinions are 100% mine.
Us home bloggers often spend a lot of time sharing all the great projects we do inside our home but the exterior often gets left to the back burner. Don't get me wrong, I've shared a lot of outdoor projects we've taken on, but there's still so much we can do, especially in regard to landscaping. I recently came across a great website from Scott's - Find beauty in the Fall where you can find fall project ideas specific to the region where you live. Yes, it's not too late to plant in the fall!
For my region, Fall gardening recommened mums and pansies. How perfect! They are both inexpensive plants and come in so many beautiful colors. I found this great pin on pinterest for mums in a planter.
Plants of varying heights is always a sure way to go and I love how these two work together. I'm not sure exactly what the center plant is called, but it looks like some relative of cattails. To be sure to get the best results with mums (and any plants and flowers), I always turn to Miracle-Gro. I've used their products before and will continue to use them because it's given me great results.
MiracleGro Logo(1).jpg
Miracle Gro makes so many amazing products whether you are using them in the ground or containers. For this container project, I would use a specialized potting medium such as Miracle-Gro® Potting Mix or Miracle-Gro® Moisture Control Potting Mix. Starting two weeks after they are planted and onward, you want to maintain your beautiful flowers by using  Miracle-Gro® LiquaFeed All Purpose Plant Food or LiquaFeed® Bloom Booster® Flower Food . This will produce beautiful blooms and healthy growth. And one more tip: your flowers will produce more blooms for a longer period if you remove flowers that have faded and started turning brown.
MG_Potting_Mix.jpg       Liquafeed_Advanced.JPG
Be sure to check out the Miracle-Gro Facebook page for more tips and to share your beautiful fall flowers.
Happy planting!

Advertisement

Visit Sponsor's Site

Thursday, September 13, 2012

DIY Wooden Book Crate

Have you ever completed a project and it turns out even better than you imagined? I just finished one of those and I am thrilled to share it with you.

My kids LOVE to read (even the little one who doesn't know how to!) and we have tons of books. Most of them are downstairs in the playroom, but we have a small collection of some of their favorites upstairs so we have easy access to them for bedtime stories. We also have a constant rotation of library books that I try to keep somewhat separate from our own books. Unfortunately, it was turning into a big jumble and something had to be done!


I saw this wooden crate from Michael's used as a shadow box on Emily's blog and I got inspired to use the same one to solve this book mess. These are the supplies I used:

crate • pre-stain • stain • stencils • paint (I actually ended up using craft paint and not wall paint) • casters • sanding block • polycrylic (I ended up using a spray version)

First thing to do is the prep work. Sand it down until it's nice and smooth. Then apply the pre-stain wood conditioner. You don't really see much of a difference, but it helps the wood take the color of the stain more evenly.


Read the directions on the can and wait the specified time and then apply the stain. I used Miniwax's walnut color, and used the same foam brush from the pre-stain. It's pretty liquidy so you really don't need to use that much. A little stain goes a long way.


After you let it sit for a while, wipe off the excess stain with a clean rag. It may look like there's nothing to wipe, but you'll see that there really is.


 Here it is all stained - already looking so much better!


I then took the letters and lined them up to space them properly before painting.


The stenciling itself was simple. I used Martha Stewart's foam stenciling brushes - just dip the brush into some craft paint, wipe off the excess and dab repeatedly in an up-and-down motion to avoid bleeding. I used some tape on the underside of the stencil to keep them from shifting and that worked out fine.


The bottom of the crate was slatted, just like the sides and I wanted a solid bottom, both for extra support for books and so they wouldn't slip through the cracks, and also to have something sturdier to screw the casters into. I happened to have some spare plywood the exact width (Divine providence!) and my dad helped me cut it down to size. We screwed the casters right through the crate and into the plywood.


The final step was to spray it with a clear protective coating. I was originally going to use the polycrylic pictured above, but I only had it in glossy and I didn't want a shiny finish. I had a can of a matte protective spray (Rustoleum) so that's what I used. (Beware, that stuff stinks!)


Here you can see the plywood on the bottom. Since I added it in after the fact, I forgot to sand it down first and it was hard to get a really smooth surface once it was screwed in. In order to protect the kids' fingers from splinters, I covered it with a layer of clear contact paper. Safety first! It's not as obvious in real life as it is here in this picture, but it'll always be covered with books anyway so I'm not too concerned.


The kids couldn't wait to fill it up with their books!


And now in its new location (subject to change, of course!).


I am so happy with how it turned out and it was a really easy project! The longest part was definitely just the waiting for the stain/paint/poly to dry. So tell me, how do you keep your kids' books organized?


Pin It

Linking up:
At the Picket Fence | Serenity Now | It's Overflowing | DIY Showoff | DIY by Design | House of Hepworths | Craftionary | Creative Jewish Mom | Today's Creative Blog | Home Stories A to Z | House on the Way | Beneath My Heart |